Page Originated 07/1999
Page Updated 09/2001
Page Updated 10/2002
Page Updated 05/2004
Page Updated 01/2011 - added Chateau Martin car photos
Page Updated 02/2015 - added PSC caboose repair job

Completed Projects

Note: The following is a small sample of what I have accomplished. From time to time I update it when an interesting job is completed, but by no means is it comprehensive. If your job isn't like any of those in this list, and you want to discuss it please contact me.

There are several sections to this page. You can jump to them and back if you wish using the following links:

Table of Contents

Selected Completed Custom Drive Jobs

If additional work was performed it is described.

Weaver SP GS-2 4-8-4
Two of these locomotives were customized. Tender decks were constructed to make the tender a little more like those behind for a GS-2 (the tenders are those that were behind GS-4/5/6).

USH CB&Q 4-8-4
Fabricated and installed cab doors and the train control box and conduit, and installed a mars light on the smoke box front.

MG AT&SF 2-10-4
Various ladders needed rebuilding.

MG UP 4-8-8-4

CB C&O 2-8-8-2

CB PRR T-1 4-4-4-4
I have customized three T-1s. These locos deserve special mention. The prototype had a rigid frame; however, the importer built the models as articulated engines so they would go around model railroad size curves. That didn't look right, so I modified them so the front engine was hinged at its front and the rear engine was hinged at its rear. Since both engines moved in a curve, the movement wasn't noticeable. This design has been copied with permission by an importer.

WS UP 4-8-8-4

SS UP 4-12-2
The loco was modified to take 60" radius curves with all drivers flanged!

Toby 4-8-2
This loco had been dropped, and the smokebox front and tender needed repairs. The Southern Green paint was repaired. A backhead was added.

Scratch SF 2-10-2
This loco had been scratch built. Two different people worked on it. The person who built the running gear did his best, but much work was required to get the loco to run smoothly. The loco was painted as part of the job.

MG SP AC-12
Many solder repairs, including tender deck railing fabrication and ladder reconstruction, were required. Brake shoes were scratch built and installed.

OVL E-units
An A and a B unit. Both were customized. They easily pulled my 65 freight car test train.

MG SP AC-9
A ball bearing boiler support rolling on a V-shaped plate was fabricated so the boiler would center over the front engine.

Milwaukee Road Cafe-Lounge Car (!)
This car was powered in order to assist the 4-4-2 on the head end up the grades. For photos and details, see: MILW Cafe-Lounge Car.

PRB AT&SF Baggage Car (!)
This car was powered in order to make heavy brass passenger trains independent of their motive power. By itself it will pull five brass cars up an uncompensated 2 1/2 percent grade. With more weight it would have pulled more, but that would have meant changing truck springs, which is very difficult. The owner decided to forgo that expense. See: Stealth Helper.

Division Point RDCs
The major problem with these cars is that they are geared improperly and as a result run too slow. Modelers run them at more than 12 volts in order get a reasonable speed. This causes excessive noise, motor overheating and failure, and even failure of the light bulbs.
My approach to making these locos run better is to change the worms on one truck, and to take the drive out of the other truck.
The worm change is to replace the single lead worm with a double-lead worm gear (the gears were made for me.) Changing the worm from a single lead to a double lead, doubles the number of teeth passing through the worm gear at the same motor RPM, which doubles the car's speed. Then it isn't necessary to put more than 12 volts through the motors to get a decent speed.
The drive train is also very noisy; by taking the drive out of one truck the noise is cut in half. An RDC with new gearing and one truck driven will pull a heavyweight car up a 3.25% grade.
The drive prevents the truck suspension from working. When the drive is removed from one truck the springs in that truck must be replaced with heavier springs as the factory springs were just cosmetic and way too weak.
Another problem with them is that the light bulbs will fail with a short! The filament is suspended on a pair of metal supports that can distort from the heat caused by the excessive voltage needed to run the factory geared models at an acceptable speed. In one RDC that I worked on, one filament support touched the other causing a short.
Regarding the motors getting warm, the motor in one that was being broken was barely warmer than room temperature after an hour of running. Again, with proper gearing, one doesn't have to put over 12 volts into the model to get an acceptable speed out of them; a cooler running motor is one benefit of changing the gearing.

Westside SP TW-8
The issue with this loco is that the firebox on the prototype narrows to the width of the frame where it meets the frame. On the model the width of the firebox becomes 48 scale inches, or one real inch. Since the firebox is attached to the boiler, the firebox has to clear the drive so the boiler can be removed. Where the drive configuration is the proven motor in firebox location, this limits the width of the motor to one inch, or about 25 millimeters. Westside used a large Mashima motor in the model. However, large is relative to HO, not O scale. The motor will move the loco but the power is so limited that the motor will stall before the drivers slip.
My approach was to use a larger motor from Pittman that uses Neodymium magnets. These magnets, also called Rare Earth magnets, result in a much more powerful and unfortunately, more costly motor.
Combined with a Northwest Short Line gearbox, the new drive will easily slip the drivers when the load is greater than what the prototype would pull. Here is a photo. Photo courtesy of Charlie Morrill.
Visible at the inside of the backhead is one of the weights I used to balance the loco. Anther weight is attached to the top of the firebox, but is difficult to see in the photo.
The motor shaft is connected to the gearbox worm shaft with the brass collar. Set screws enable disassembly for servicing.
I have modified three of these locos in this manner. The gearbox change is not straight forward because the axle diameter on the model is 4MM, but NWSL does not catalog a gearbox for this axle diameter. It is necessary to adapt the axle gear from the gearbox kit for another size axle to the 4MM axle, and to fabricate new brass side bushings for the gearbox.
Other changes are the usual customizing changes: relocate the factory boiler weight to balance the engine over the drivers, changing the spring on the pilot truck to leave more weight on the drivers, all of which make the loco pull more. I found that the pilot wheels short on the cylinders and so increased the wheelbase of the pilot truck by 1/16" which fixed the shorting problem. The wheelsets on the tender are replaced with NWSL steel wheelsets; this requires fabricating bushings because the NWSL axle end is smaller than the journal in the truck. Wipers on all tender axles and hardwiring the wipers to one motor brush greatly improves slow speed operation if the track and wheels are clean.

Go to Table of Contents

Selected Completed Custom Building Jobs

Domes for Kasiner passenger car kits
These domes were unusual in that all windows were flat plate glass. Four domes were fabricated out of brass and fit to the car bodies.

Square tender for C&O 2-8-8-2
The demanding owner was ecstatic.

Oil tender for SP 2-8-8-4 AC-9
A sister to the C&O tender, this tender has been exhibited at O Scale West and at the Chicago March Meet.

Complete SP GS-1 4-8-4 locomotive and tender
This loco has been exhibited at O Scale West, Chicago, and O Scale National conventions.

Chooch Ultra Scale II NP Boxcar
This car was built as a personal car from the above kit.
End view.
Side view.

Overland SP H12-44
This loco is a personal loco. It was painted about 10 years ago with Accu-Flex paint (remember them?) And then it sat until a DCC decoder with enough functions became available. All lights are indivually controllable: headlight, front mars light, front class lights, engine number lights, train indicator lights, rear headlight, rear class lights, rear mars light. Decals are by Microscale. All the striping is painted. Drive is stock. Decoder is an NCE D408SR. A crew would not fit into the cab, which is unfortunate because of all that glass. Note that the wind wings have glass in them.
When a Tsunami 750 was installed for sound, the light functions were consolidated so that other funtions were available in the 0-9 range for sound control.
Front view.
Rear view.

C&O L2a 4-6-4 Conversion to L2
New cylinders, pilot, pilot deck, and valve gear. Redetailed boiler, trailing truck, and tender.

Chateau Martin Wine Tank Car Conversion from Lionel Milk Tank Cars
The pink on These cars was painted by someone else. I converted them to 2-rail, applied the decals, sprayed the clear coat (which softened the pink a bunch - whew!), and then reassembled the cars. The KDs are mounted to a cast brass plate made from my pattern. The plate includes an ear to which the air hose detail can be mounted.
View of all four cars sitting on recently completed yard tracks on my personal layout.
End view of one car showing the KD and air hose detail.

Photos In Other Locations on the Internet
Photos of other projects that I have completed, mostly for my personal layout, can be found in two of the yahoogroups that I frequent. They are Oscalekings and oscalemodelers. In Oscalekings you can find them in the Photos section under Rod Miller's Photos. In oscalemodelers you can find them in the Files section under RM-01.

Go to Table of Contents

Selected Completed Repair and Upgrade Jobs

Driver wheelsets
Built up driver wheelsets starting with customer provided wheel center castings. Machined castings, made axles, made crank pins, modified counterweights, assembled wheels to axles so they were quartered, in gauge, and had no wobble.

Smokebox fronts
Fabricated smokebox fronts from customer provided parts.

Dented brass passenger car
A heavy square object had been dropped on this car, which was factory painted in the SP silver and red scheme. The side was bent, and the end was twisting into a parallelogram. After the repair the only way to tell the car had been damaged was to inspect it very carefully.

Worn side rods
Re-bushed worn side rods on both a CB UP 2-8-8-2 and a SS NCNG 2-8-0. The plating on the tires on the 2-8-0 was worn to the point where the brass was showing. The 2-8-0 tires and rods were re-plated to their new appearance.

Jerry White custom built locomotive restoration
Restored two Jerry White custom built locomotives to their as delivered condition. One was an SP AC-11 4-8-8-2 and the other was the Lima 4-8-6 (the prototype was never built but both Jerry and Bill Lenoir built models.) Both locos required extensive solder repair. The poppet valve gear on the 4-8-6 was missing major parts and had to be rebuilt. Both locos were repainted and redecorated as part of the job.

Box pok main drivers
Fabricated box pok main drivers for a UP 4-12-2.

Exhaust Stacks on a VO-1000 Diesel
Fabricated and installed eight exhaust stacks for a VO-1000 diesel. The model is by Car Works. The mounting hole for the original single exhaust stack was filled. The location and spacing of the stacks was determined from a drawing. The stacks themselves are best match to stacks shown in a photo. The loco was painted by someone else, and is in service on a standard gauge logging layout where it adds a lot of character. The photos were taken on my home layout.
Overall view.
Detail view of the stacks.

Repair shipping damage on a PSC caboose
When received both ladders had broken loose and were bent, one end platform was bent down, the end fascia was bent, and the running board was bent. This photo shows the model after the end platform was bent up and before any other repairs were made. This photo shows the fascia after repair. Finally, this photo shows the model after the ends and roof were re-painted.

Repair Cracked Sprockets on a Duddy/Wolfer PRR E44
This unfortunately is a very common problem with our model trains because plastic drive parts (gears, U-joints, sprockets) are press fitted to shafts. Over time the plastic shrinks, causing the plastic part to crack and lose its grip on the shaft resulting in failure of the drive. I have lost track of how many of these I've either repaired or built properly; none of those I've built/repaired has been returned even though my work is fully warranted. Two personal locomotives over 25 years old with Delrinr chain drives are as good as the day I built their drives. I chose to present this job because of the problems that had to be overcome in order to complete the repair. The truck frames had been soldered together; however, the keeper plates on the journals were not removable so there was no way to remove the axles from the truck other than taking the truck apart with in this case meant de-soldering the truck frame into its component parts.

To remove the axles it was necessary to separate at least one side frame from the bolster, and to disconnect the end beams from each end of the sideframe to be separated. Because of the mass of the parts a torch would be used to place high heat to as small an area as possible. Compare with using a hot air gun for disassembly.

The issues with de-soldering the truck frames were 1) I wasn't familiar with the truck parts so I didn't know if the parts had locating pins so that they could be re-assembled properly, and 2) I wanted to minimize repair of parts that might fall off or change position during heating of the large parts.

I decided upon the general solution of completely separating the bolster from both side frames. That left the issue of the end beams where the heat of the torch could cause several parts to loosen. In lieu of de-soldering the end beams it was simpler to cut them in the middle; a keeper plate was fabricated and installed to provide strength when the truck was assembled later. 
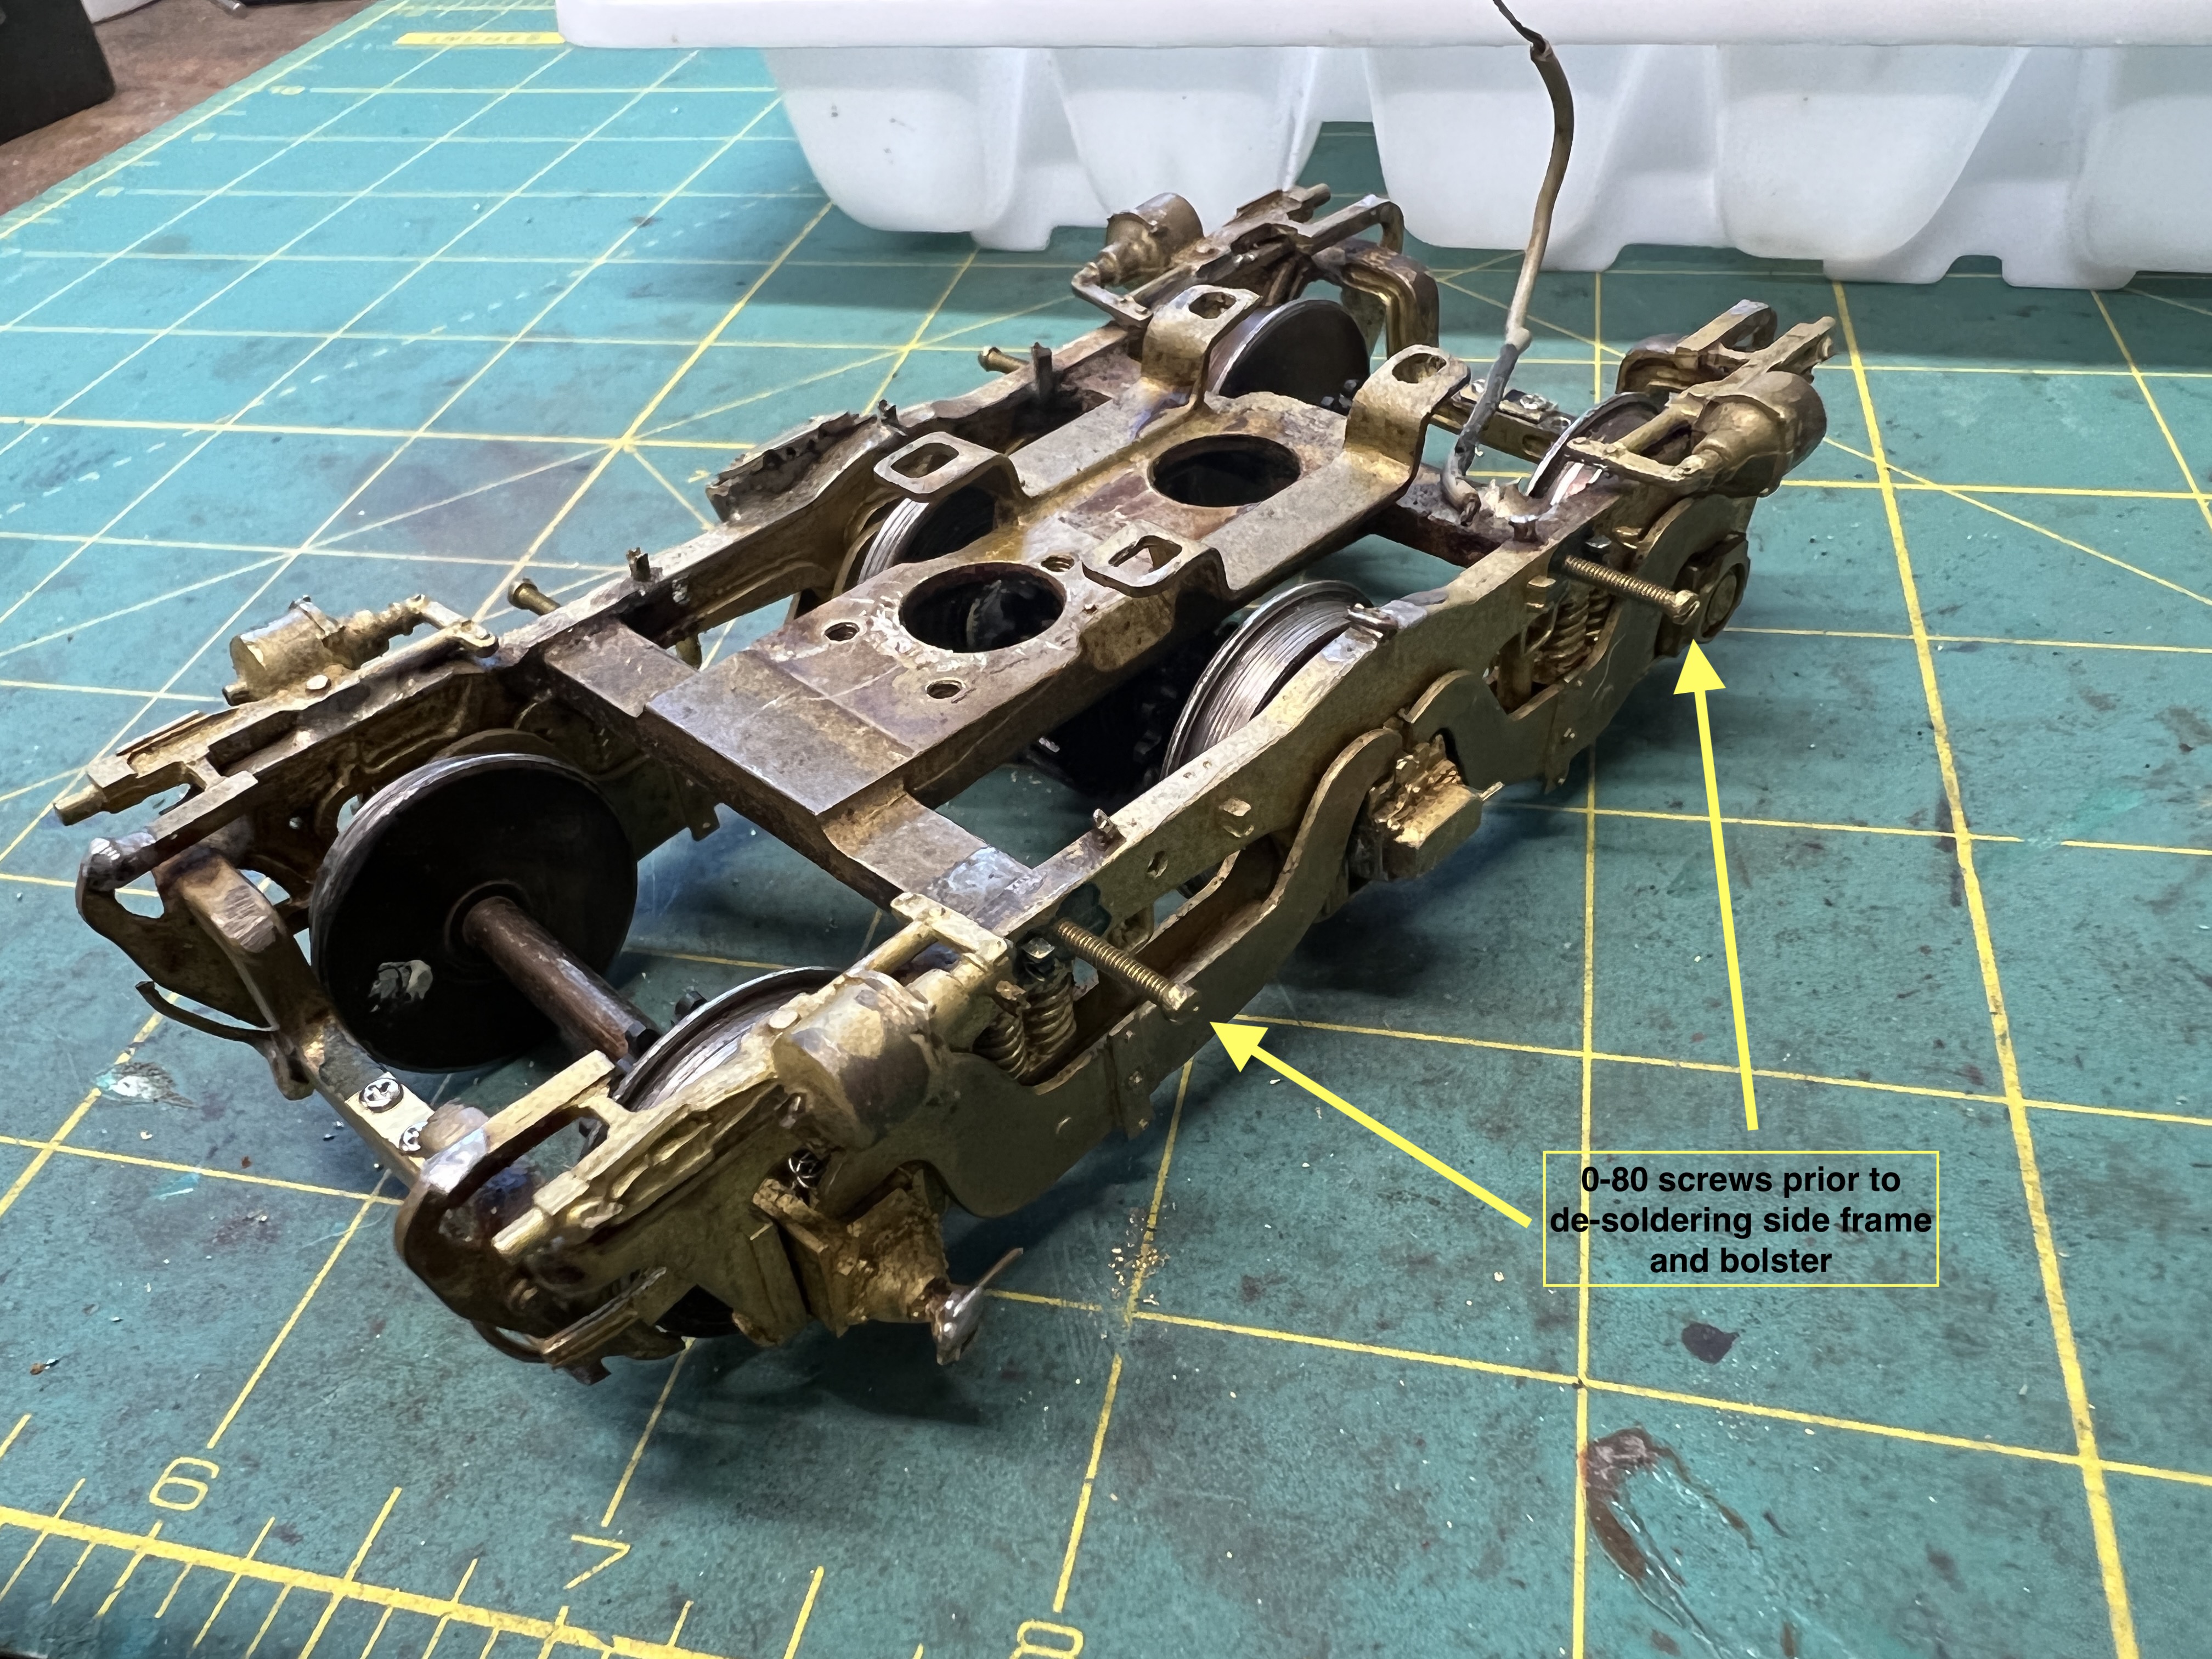
Since it wasn't known if there was provision for locating the bolster conection the to side frame, I drilled through the side frame into the bolster and tapped the holes for screws which would serve as locating pins after the bolsters were separated from the side frames.

Here's a photo of one of the trucks with the end beam keeper plates installed and the locating pins installed.

The equalizer bars and axle journals were removed from the side frames. A saw cut was made between the keeper plate screws on the end beams, the corners of thse truck were wrapped with damp cloths, and the bolster joints with the side frame were heated until they separated. The solder was cleaned up. There was no collateral damage to other solder joints from the heat. The truck was re-assembled using the locating pins and keeper plates, and blocks were soldered to the side frames under the bolster connection, and holes were tapped for screws to attach the bolster to the side frame.
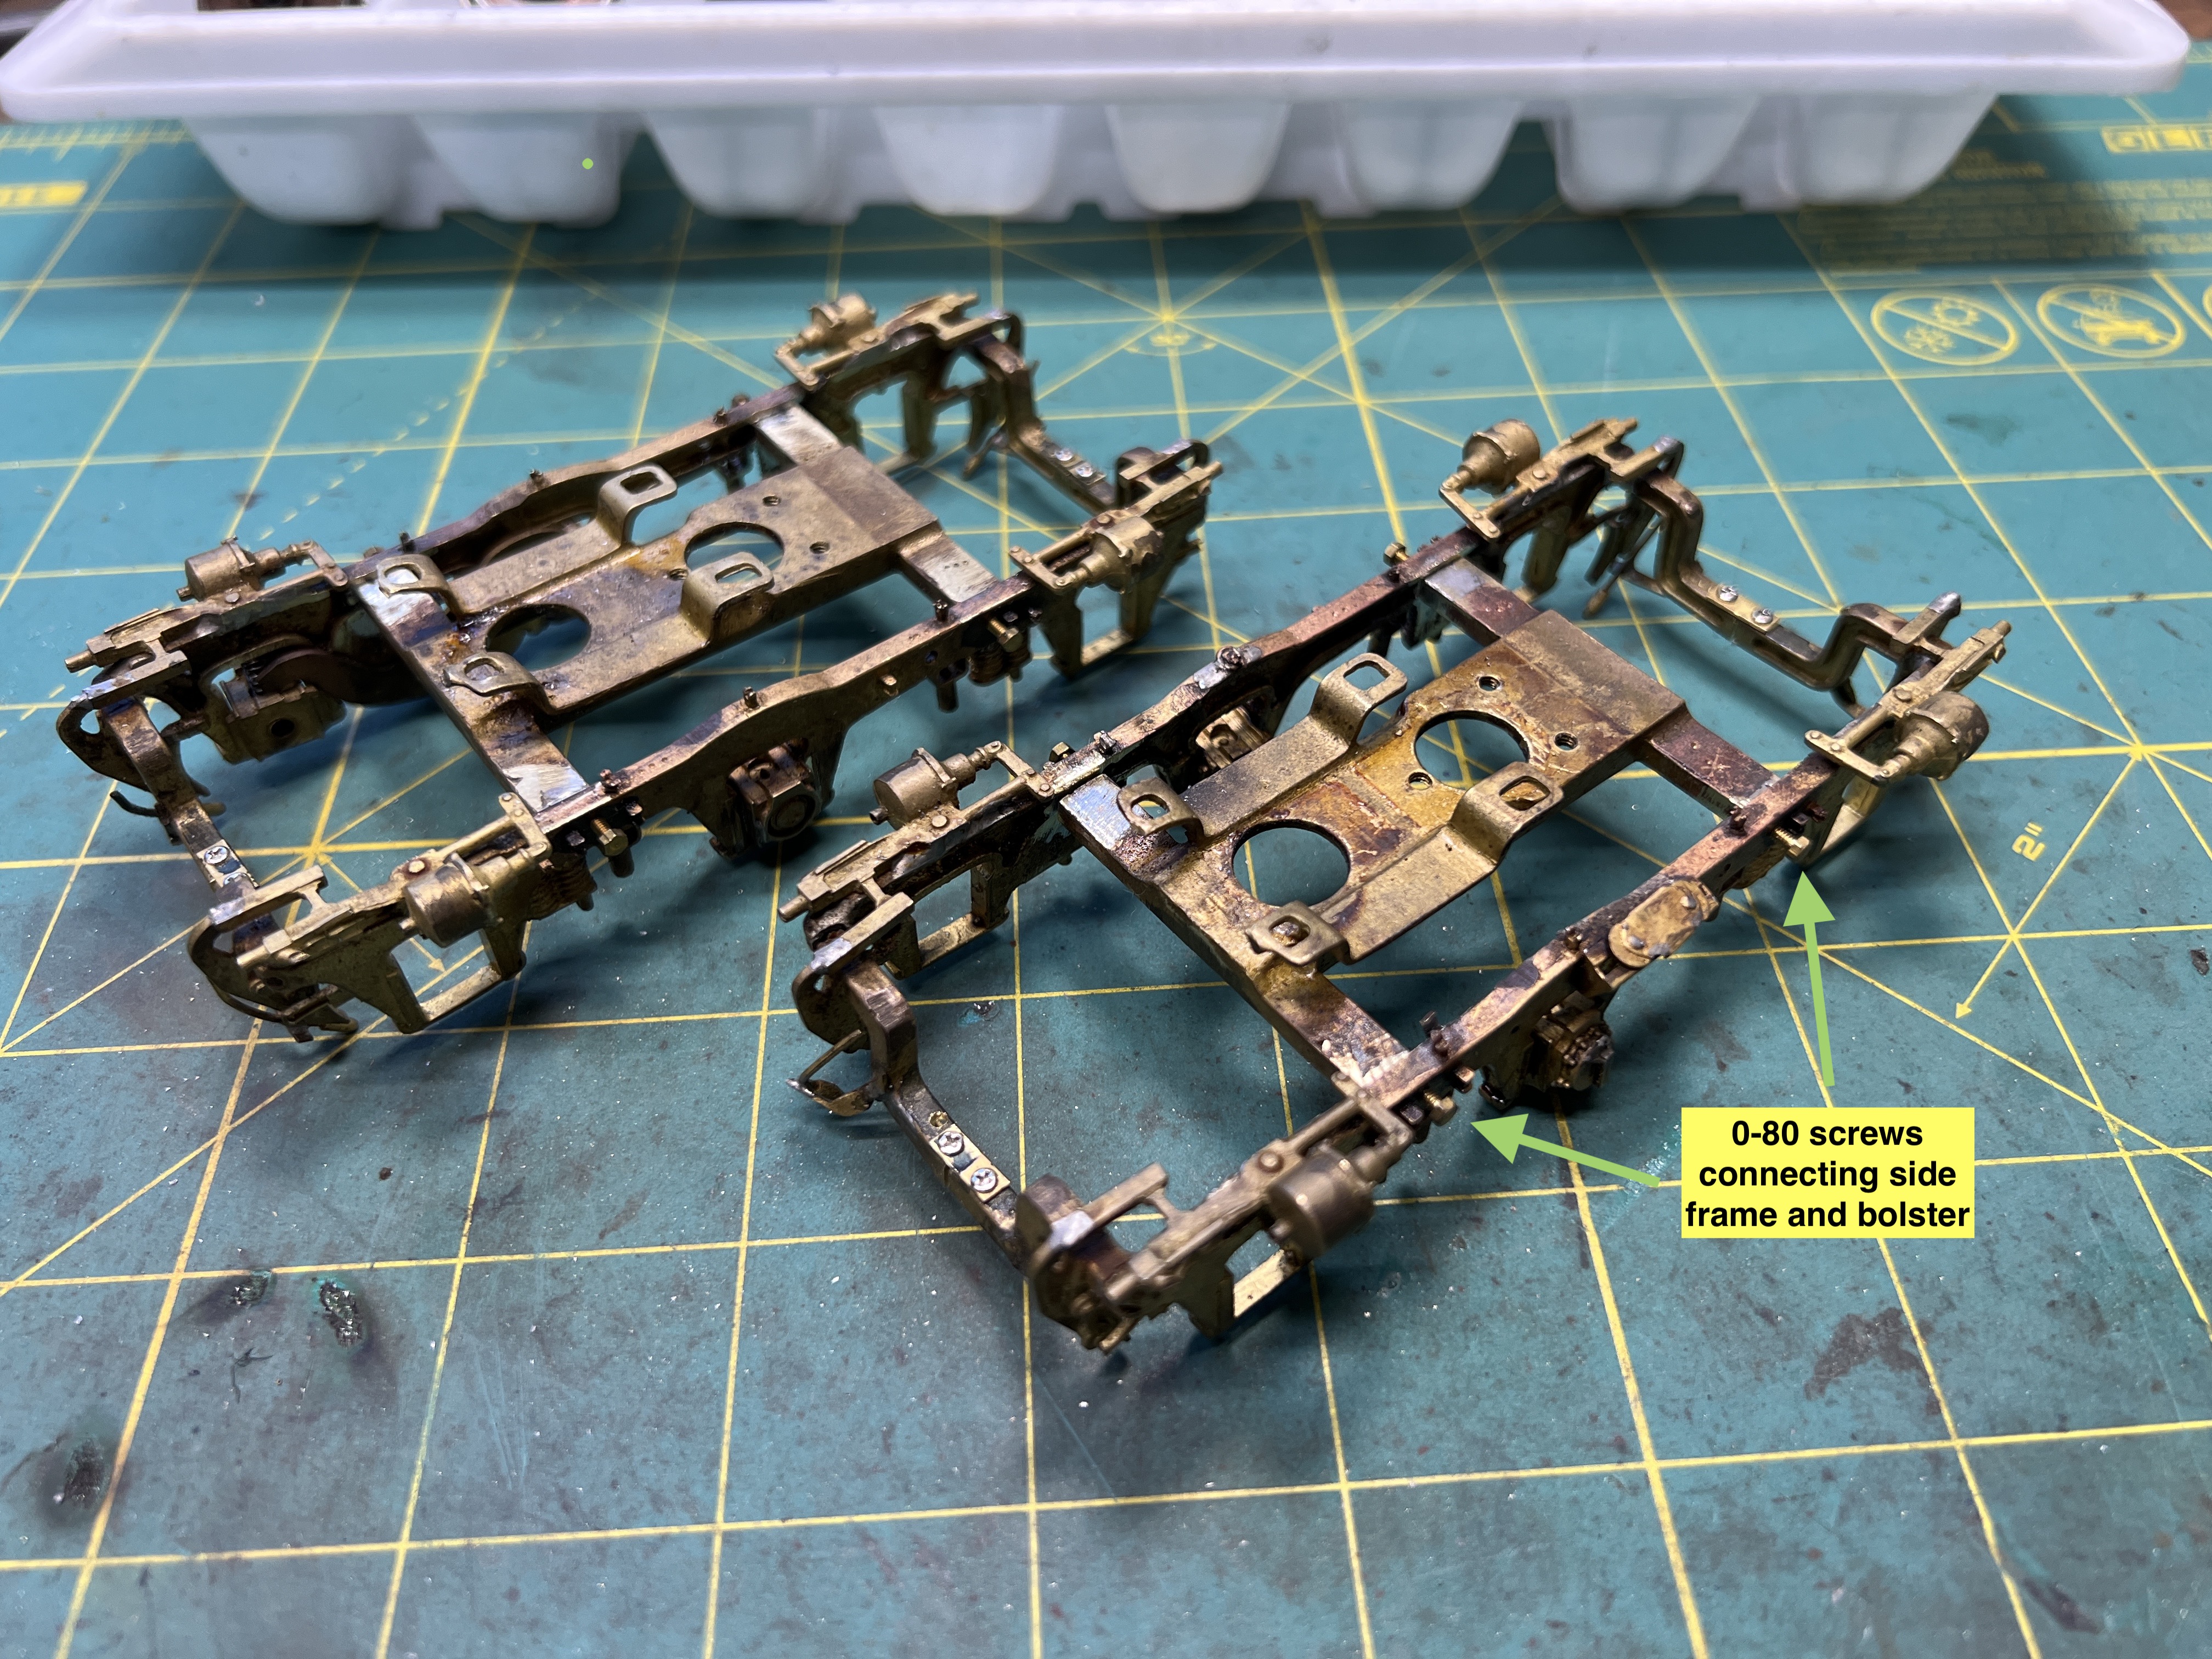
Here's a photo of the trucks after they were taken apart, solder cleaned up, and the locator pins installed. The saw cut through the end beams is barely visible in the end beam at the upper right.

Here's a photo after the keeper pin holes have been filled, the axle sprockets have been replaced, the truck have been fully assembled with screws, and the chains installed.

Finally, here's a video of the repaired loco running on my test loop:

Go to Table of Contents

Selected Completed DCC Jobs

General expertise
Importer and distributor of the Lenz system for four years. Five year member of the NMRA DCC committee. Learned command control by installing Keller Onboard on a pre-DCC layout. Lenz DCC is installed on my home layout. I use an NCE PowerCab at the workbench. I have installed decoders and sound in a number of locomotives, all were O scale and with speakers in the smokebox if the loco is a steam loco. A partial list of DCC installs (most included sound) is:
  1. Overland SP GS-4 (D408SR + Tsunami)
  2. Overland SP GS-5 (D408SR + Tsunami)
  3. U.S. Hobbies SP MT (Zimo MX65, no sound)
  4. PSC SP P-10 (Lenz LE230 + Sountraxx DSX)
  5. Lobaugh Lost Wax SP 2-8-2 (D408SR + Tsunami)
  6. Key SP F-7 AB (Soundtraxx DSD-150 in each unit)
  7. Glacier Park SP 2-8-2 (Tsunami)
  8. Glacier Park SP 2-8-0 (Tsunami)
  9. Glacier Park SP 2-6-0 (Tsunami)
  10. Overland S2 (D13SR + Micro Tsunami)
  11. Overland FM H12-44 (D408SR + Tsunami)
  12. PSC SP GS-4 (D408SR + Tsunami)
  13. PSC Cab-forward (D408SR + Tsunami)
  14. Sunset USRA 2-8-2 (D408SR + Tsunami)
  15. 3rdRail PRR 2-8-8-2 (D408SR + Tsunami)
  16. PFM SP 2-8-0 (Tsunami)
  17. 2nd PFM 2-8-0 (Tsunami)
  18. Overland MILW 4-4-2 (D408SR + Soundtraxx DSX)
  19. Overland PA+PB (D408SR + Soundtraxx DSX, speaker in each unit)
  20. Red Caboose GP-9 (Lenz LE130, no sound)
  21. Lobaugh SP 0-6-0 (D408SR, no sound)
  22. Westside SP 4-8-0 (Tsunami)
  23. Vulture Models SP 4-6-0 (Tsunami)
  24. U.S.Hobbies SD-9 (D408SR, no sound)
  25. Glacier Park SP 0-6-0 (Tsunami)
  26. PSC MT (D408SR + Tsunami)
  27. PSC AC-10 (Protocraft Tsunami)
  28. OL GN 2-8-8-2 (Protocraft Tsunami)
  29. RY Models GE 44 tonner (Tsunami)
  30. Westside SP 4-8-0 (D408SR + Tsunami)
  31. Overland A-B-A Sharks remotor + (D408SR + Tsunami)
  32. Car Works PE car (Lokpilot, no sound)
  33. 3rdRail FP-7 ABA set upgraded and tuned factory QSI decoders
  34. 2nd 3rdRail FP-7 ABA set upgraded and tuned factory QSI decoders
  35. Weaver RS-3 combination of NCE D408SR and Sountraxx Econami decoders
  36. Car and Locomotive Shop SP 5000 4-10-2 3 cylinder, Soundtraxx Tsunami2 2 amp decoder
  37. Unknown SP cab forward, 8 amp NCE decoder, sound
  38. Red Caboose GP-9 changed frame to metal frame
  39. Red Caboose GP-9
  40. Red Caboose GP-9, re-motored, Tsunami2, Tang Band speaker
  41. S scale River Raisin SP 2-6-0 Tsunami2, Tang Band speaker in custom enclosure in the boiler
  42. S scale E-7 three units, lights and sound
  43. S scale FA/FB 9 five units, lights and sound
  44. S scale GP units three units, lights and sound
  45. S scale RS-3 units (three units, lights and sound
  46. S scale E-8 units (five units, lights and sound
  47. S scale SW-9 three units, lights and sound
  48. S scale SW-1 three units, lights changed to incandescent, Tang Band speakers in custom enclosures
  49. S scale RS-11 two units, lights and sound, Tang Band speakers in custom enclosures

Go to Table of Contents

CONTACTING ME

Interested in learning more about 2-rail O scale? Please visit the O Scale Kings web pages.

These web pages were designed and implemented by Rod Miller.
© 1998-2022 Rod Miller All Rights Reserved