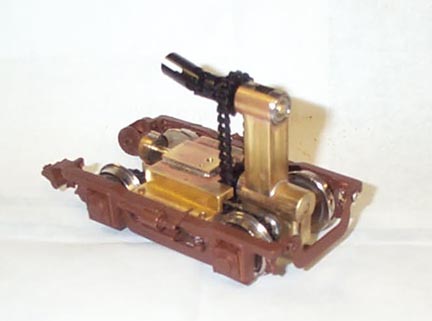
The bolster was machined from a block of brass. A sheet brass height adjustment plate is on the top.
The gear ratio is 7.5:1 which produces a top speed of 65 scale MPH at 12 volts.
I fabricated everything that went into the drive except for the ball bearings, sliding U-joints, and the delrin chain and sprockets.
The sprockets are not press-fitted to the axles, which will cause them to split eventually (raise your hand if you have had a loco with a split plastic gear (my hand is up!) Instead I ream the sprocket hole to be a slip fit onto a brass bushing (the reaming also insures that the sprocket runs true.) The bushing is knurled so that when it is pushed into the sprocket, the raised edges of the knurls cut into the plastic and grip it, preventing the sprocket from turning on the bushing. The bushing is then press fit in a metal-to-metal fit onto the axle shaft.
All photos were taken before the gearbox, et al were painted black.
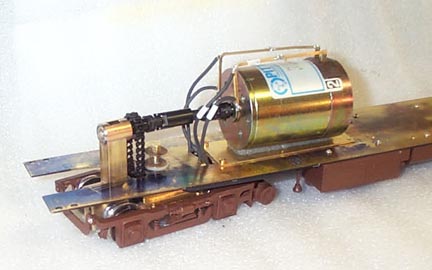
The motor is glued to its 1/32 sheet brass mounting bracket using silicone sealant. You can pick up a heavy loco by the motor, the bond is so strong.
I use Weaver sliding U-joints to connect pivoting shafts with fixed shafts. Normally only the sprockets on the tower shafts are pinned. On this project I had to shorten the sliding part of the u-joint along with the motor shaft in order to fit it into the available area, and almost everything ended up pinned to its shaft.
A slight tilt of the tower away from the motor is apparent in the photo. That was caused by a mis-calculation in the height of the stabilizer bearing bracket on the rear axle (corrected after the photo was taken.) Because of the sliding U-joints, the only effect of the tilt was cosmetic.
Note the white color codes on the wires and the motor brush bus bar.
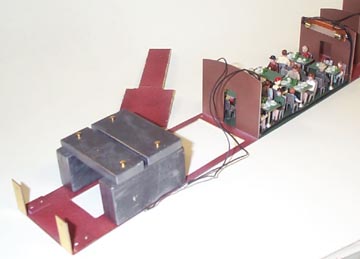
Here is the interior assembly showing the cutout in the lounge floor to accommodate the motor and gearbox tower. The piece cut out from the floor is behind and partially obscured by the weight assembly. The weight assembly was fabricated from 1/4 inch thick sheet lead, and is centered over the truck.
The wires you see are for the interior lighting. They plug into barely visible sockets on the motor brush bus bars seen in the second photo.
The interior slides into the car from the lounge end, and the car
end is screwed to the vertical tabs you see at the end of the floor.
After the interior is installed in the car body, the frame with drive
is installed.
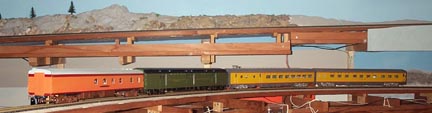
Here is the car pulling a PRB horse-baggage-express car, a Wasatch cafe-lounge, and a Wasatch sleeper up the lower to upper deck transition loop on my layout. The loop is on a two and a half percent grade. The Wasatch cars have full interiors and are quite heavy, so getting that train up the grade produces some wheel slippage, most likely attributable to plated wheels on the trucks.
The upper level behind the train is a continuation of the track the train is on, and is on the same grade, which gives you an idea of the grade. The upside-down L-girders behind the train are level.